Preferred order of boat storage options:
- Heated boatyard hangar or barn (best, but most expensive)
- Unheated barn or garage
- Outside, covered (shrink-wrap or suitable off-season cover)
- Outside, uncovered (avoid this option, if possible)
Some places to store your boat during the offseason:
- Some Boatyards Near Falmouth
- Great Island Boatyard (Harpswell)
- Brewer South Freeport (So. Freeport)
- Royal River Boatyard (Yarmouth) – They have a drive-in self-storage lot off Bayview St.
- Yankee Boatyard (Yarmouth)
- Yarmouth Boatyard
- Bayside Boat Sales (Freeport) – Steve Trenholm
- Handy Boat
- Maine Yacht Center
- Portland Yacht Services
- Cumberland Fairground
- Someone’s barn
- Someone’s yard
Boatyards in mid-coast or down-east, or inland (e.g., Sebago) typically are less expensive than those here in the Portland/Falmouth area.
Winter Storage Covers
Below are some approaches to DIY boat covers (actually the support frames) used when storing your boat outside during the Maine winter.
WhiteHawk Template:
This is a stick-figure diagram looking at the side of the cover, bow on the right…
Stern Deck Cockpit Chainplates Bow Deck
C B A1
L—————-T——————-TT———-=\
| | / \ \
| 4 | 3 2P / \ 2S \
| | / \ \
I have turned 1 and A into one angled pipe of 139”
- “2” = 60 inches on long surface, 57” on underside, cut ends at 125 degrees.
- “3” = 76”
- “4” = 49 “
- “B” = 74
- “C” = 106”
- “A” has a 12” pipe glued to a 22 Degree angled joint that attaches to a 95” pipe that mates to a coupler with another 32” of pipe with a steeply angled cut of 20 degrees to lie along the foredeck.
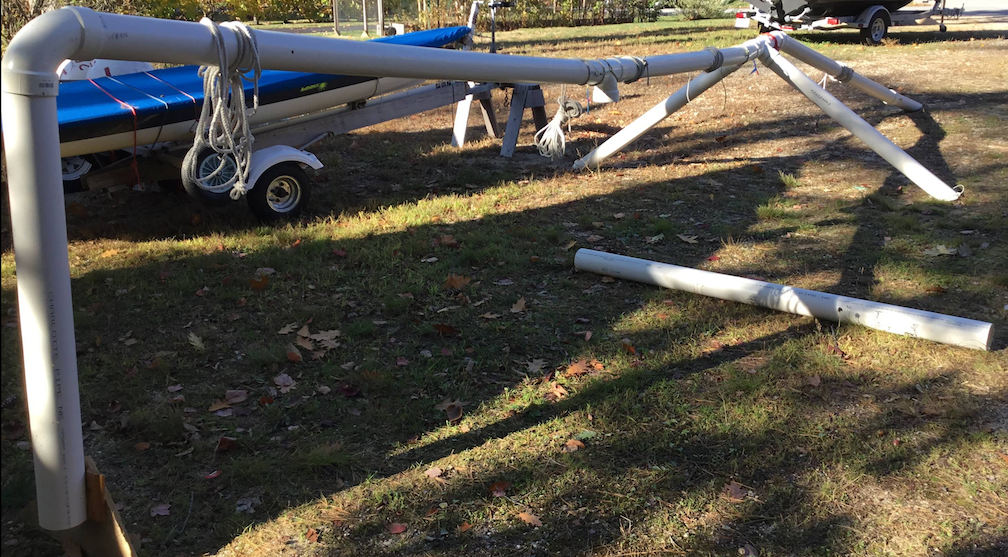
Fortitude Template:
1174 Fortitude, similar to 1350 Schadenfreude 2:
Stern Deck Cockpit Chainplates Bow Deck
C B A
L—————-T——————–TT——————L
| | / \ |
| 4 | 3 2P / \ 2S 1 |
| | / \ |
Assembly Breakdown:
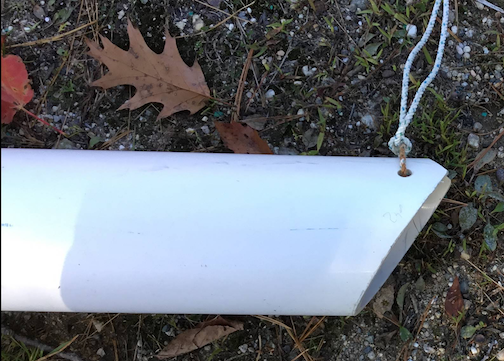
- A = 98” straight pipe. 30” tie ropes installed in each end, for assembly.
- B = 75” straight pipe. 30” tie rope aft, 48” tie rope fwd (holds both TTs)
- C = 105” straight pipe. 30” tie rope in each end.
- 1 = 44” upright pipe, includes L, placed on plywood base on foredeck.
- 2P, 2S = pipe legs, 59.5” long side 56.5” short side, includes “Ts,” ends cut to 35 degree angle to fit deck. Small 3/16” line installed in deck ends, tie to chainplates.
- 3 = 76” upright pipe, includes “T,” ties to aft end of center console, extends down to cockpit deck, placed on plywood base, front edge cut to fit flush against console.
- On 1174, a recess hole is cut in the forward face of #3 upright, fits over the backstay cam cleat, so #3 can be tied flush to console.
- 4 = 49” upright pipe, includes L, placed on plywood base. Strong winds require this upright to be tied in place with guy ropes, from “L” to trailer, both sides.
PVC Fittings:
- L = 90 degree PVC “L”
- T = 90 degree PVC “T” fitting
- TT = two (2) PVC “T” fittings, with short coupling pipe in aft “T,” rotated to place legs just inside the chainplates
- BASE = under #1, #3 and #4; plywood, carpet underneath, with PVC adapter ring on top (bases are removable for storage).
Assembly Sequence (bow to stern):
- Assemble A, 1 and 1-Base on fwd deck; tie A to the “L.”
- Assemble 2P & 2S to aft end of A; tie “Ts” and A together; tie chainplates.
- Secure 3 to console; assemble 3 and B; tie at “T.”
- Assemble 4 and C, tie at “L” and “T.” Secure “4L” with side guys.